Integrating Paystack Payment Gateway Into Your Django Project - Part I
Integrating Paystack Checkout and Payment Verification

Experienced DevOps and Backend Engineer with a passion for empowering organizations to leverage technology to achieve their goals. With years of hands-on experience in infrastructure automation, cloud computing, and API development, I excel in designing, implementing, and managing high-performance, scalable, and secure systems. I am an avid learner and always seeking to stay ahead of the curve, having a deep understanding of cutting-edge technologies such as Ansible, Kubernetes, Terraform, and Micro-Services.
My expertise in DevOps has allowed me to streamline deployment processes, increase efficiency, and reduce downtime for my clients. I have a strong background in Linux administration, network security, and database management, and am comfortable working with a variety of programming languages, including Python, Javascript, and Go.
I have a proven track record of delivering high-quality, robust, and efficient code. My expertise in Python and related technologies such as Django, FastAPI, and SQLAlchemy, enables me to build dynamic and versatile applications that meet the evolving needs of businesses. I have a deep understanding of RESTful API design, microservices architecture, and cloud computing, and am comfortable working with cloud platforms such as AWS. I believe in the power of automation and have extensive experience in implementing CI/CD pipelines, automating testing, and monitoring production systems.
Outside of work, I enjoy sharing my knowledge and experience through speaking engagements and contributing to open source projects. I am dedicated to continuously improving my skills and am always on the lookout for new challenges and opportunities to learn and grow. Let's connect and see how we can collaborate and drive digital transformation together!
Using a payment gateway, you can delegate payment processing to a secure and reliable third-party service. This means you would not have to worry about the technical, security, and regulatory complexities of processing credit card payments within your application. Instead, you can rely on a trustworthy payment gateway to handle these aspects.
In this article, you’ll integrate Paystack's payment gateway, a popular payment gateway utilized by various online platforms. Paystack's API (Application Programming Interface) allows you to manage and process online payments via several payment channels, including Mobile money, Cards, and Bank transfers.
Objectives
Integrate Paystack payment gateway into your Django project - Part 1
Verify payments and store references for future use - Part 1
Use Webhooks to manage payment notifications and verification - Part 2.
Prerequisite
An active and functional Paystack account.
A general understanding of APIs and Webhooks
Note that this article is split into two parts to make it easier for readers to digest the information and to allow for a more focused and in-depth exploration of the topic. This is part one(1) of the article. Check out part two(2).
What Makes Paystack an Excellent Choice?
Paystack provides various products for payment processing and can handle one-time payments, recurring payments for subscription services, and more. Paystack offers different integration methods, from using Paystack-hosted payment forms to fully customizable checkout flows.
Here, you’ll integrate the Paystack redirect checkout product, which uses a payment page to optimize conversions. When users initiate a payment, they’ll be redirected to a payment page that lets them quickly pay with a credit card or another preferred method.
To receive payment notifications from Paystack, you’ll use Webhooks. By leveraging Paystack redirect checkout for payment processing, you can depend on a secure solution that complies with Payment Card Industry (PCI) requirements.
Project Setup
Follow the steps below to set up a project.
Create a Virtual Environment & Install Dependencies
It is recommended to create your Django project in a virtual environment. This makes managing libraries and versions easy.
Create a directory and navigate into the directory:
  mkdir payment
  cd payment
Create and activate a virtual environment:
  python -m venv venv

  source venv/bin/activate # Linux
  venv\Scripts\activate.bat # Windows
Install the required Python libraries:
  pip install django
  pip install requests
  pip install django-widget-tweaks
The django-widget-tweaks library is optional. It is to help with form rendering and Bootstrap.
Create Your Django Project
While still in the payment directory, execute the following command to create a Django project:
django-admin startproject mypayment
Create the payment app: change into the project directory and create an app
cd mypayment
python manage.py startapp payment
Now, open the project in an IDE of your choice and activate your virtual environment. Add the payment application to the mypayment/settings.py file. Also, add the django-widget-tweaks library you installed earlier.

Configure Your Project Templates Settings
You will configure the template directory and create a base template so other templates can inherit from it.
In your project directory, execute the following command to create a template directory.
mkdir templates
Add the templates directory path to the settings.py file as shown below.

Create a base.html file in the templates directory and add the following code.
<!doctype html>
<html lang="en">
<head>
    <!-- Required meta tags -->
    <meta charset="utf-8">
    <meta name="viewport" content="width=device-width, initial-scale=1">
    <title>My Payment</title>
</head>

<nav class="navbar navbar-expand-lg navbar-light bg-light">
    <div class="container-fluid">
      <a class="navbar-brand" href="/payment/">My Payment</a>
    </div>
</nav>

{% if messages %}
    <div class="alert alert-success">
        <ul class="messages">
            {% for message in messages %}
            <li{% if message.tags %} class="{{ message.tags }}"{% endif %}>{{ message }}</li>
            {% endfor %}
        </ul>
    </div>
{% endif %}

<body>
    {% block content%}
    {% endblock %}
</body>
<!-- Bootstrap CSS -->
<link href="https://cdn.jsdelivr.net/npm/bootstrap@5.1.3/dist/css/bootstrap.min.css" rel="stylesheet" integrity="sha384-1BmE4kWBq78iYhFldvKuhfTAU6auU8tT94WrHftjDbrCEXSU1oBoqyl2QvZ6jIW3" crossorigin="anonymous">
</html>
The base.html defines an HTML skeleton document that other templates will inherit from. It’s the job of child templates to fill the empty blocks with content.
At this point, your project directory structure should look like the one below.

Create Database Models
You will need to create a payment model to store payment data and track transactions.
Add the following code to the models.py file of the payment application:
from django.db import models

class Payment(models.Model):
    first_name = models.CharField(max_length=50)
    last_name = models.CharField(max_length=50)
    email = models.EmailField()
    amount = models.DecimalField(max_digits=10, decimal_places=2)
    city = models.CharField(max_length=100)
    created = models.DateTimeField(auto_now_add=True)
    updated = models.DateTimeField(auto_now=True)
    paystack_ref = models.CharField(max_length=15, blank=True)
    paid = models.BooleanField(default=False)

    class Meta:
        ordering = ['-created']

    def __str__(self):
        return f'Payment {self.id}'

    def get_amount(self):
        return self.amount
The Payment model class attribute names are as self-explanatory as possible. The get_amout method acts as a getter, allowing you to retrieve the amount attribute.
Once you have created the models, migrate them to the database by executing the commands:
python manage.py makemigrations
python manage.py migrate
Create Admin User
Create a user to log in to the admin site. Run the following command and follow the prompt.
$ python manage.py createsuperuser
Next, add the following code to the admin.py file of the payment app to register the models on the admin page.
from django.contrib import admin
from .models import Payment

@admin.register(Payment)
class PaymentAdmin(admin.ModelAdmin):
    list_display = [
        'id', 'first_name', 'last_name', 'email',
        'city', 'paid', 'updated',
    ]
    list_filter = ['paid', 'created', 'updated']
Building the Payment Process
The payment process will work as follows:
A User fills out and submits the payment initialization form to initialize the payment process.
The user proceeds with making payments.
The user is redirected to Paystack checkout.
The user enters card details and makes payment.
Create a Payment Initialization Form
In other to persist users’ data for each payment made. You need a form.
You’re going to use Django ModelForm for this. If you’re building a database-driven app, you’ll have forms that map closely to Django models(the Payment model in our case). Hence, defining the field types in your app form would be redundant because you’ve already defined the fields in your payment model.
So, create a forms.py file in the payment application directory, then add the following code.
from django import forms
from .models import Payment

class PaymentInitForm(forms.ModelForm):
    class Meta:
        model = Payment
        # model fields to include when creating form object
        fields = ['first_name', 'last_name', 'email', 'amount' ,'city']
Create Payment Initialization View and URL Endpoint
You’re going to create a payment_init view to render form and process form submission. The view is responsible for validating the form on submission, adding the payment to the current Django session so other views can access it, and redirecting the user to payment:process to complete payment.
Add the following code to the views.py file of the payment app.
from django.shortcuts import redirect, render
from django.contrib import messages
from django.urls import reverse
from .forms import PaymentInitForm

def payment_init(request):
    if request.method == 'POST':
        # get form data if POST request
        form = PaymentInitForm(request.POST)

        # validate form before saving
        if form.is_valid():
            payment = form.save(commit=False)
            payment.save()
            # set the payment in the current session
            request.session['payment_id'] = payment.id
            # message alert to confirm payment intializaton
            messages.success(request, "Payment Initialized Successfully." )
            # redirect user for payment completion
            return redirect(reverse('payment:process'))
    else:
    # render form if GET request
        form = PaymentInitForm()
    return render(request, 'payment/create.html', {'form': form})
Create a urls.py file in the payment application directory, and add the following code.
from django.urls import path
from . import views

app_name = 'payment'

urlpatterns = [
    path('', views.payment_init, name='create'),
]
The code above maps URL paths to Python callback functions (views).
Edit the mypayment/urls.py file and add the code.
from django.contrib import admin
from django.urls import path, include

urlpatterns = [
    path('admin/', admin.site.urls),
    path('payment/', include('payment.urls')) # new
]
The code above includes the payment app urls.py module to the project’s global URL config.
Create an HTML Template for the View
Create a directory named payment in the templates directory you created earlier, then create a create.html file in the payment directory you just created.

Add the following code to create.html.
{% extends "base.html" %}
{% load widget_tweaks %}

{% block content%}
<div class='container-fluid mt-3'>
    <form method="post" >
        {% csrf_token %}
        {% for hidden_field in form.hidden_fields %}
          {{ hidden_field }}
        {% endfor %}

        {% if form.non_field_errors %}
          <div class="alert alert-danger" role="alert">
            {% for error in form.non_field_errors %}
              {{ error }}
            {% endfor %}
          </div>
        {% endif %}

        {% for field in form.visible_fields %}
          <div class="form-group">
            {{ field.label_tag }}

            {% if form.is_bound %}
              {% if field.errors %}
                {% render_field field class="form-control is-invalid" %}
                {% for error in field.errors %}
                  <div class="invalid-feedback">
                    {{ error }}
                  </div>
                {% endfor %}
              {% else %}
                {% render_field field class="form-control is-valid" %}
              {% endif %}
            {% else %}
              {% render_field field class="form-control" %}
            {% endif %}

            {% if field.help_text %}
              <small class="form-text text-muted">{{ field.help_text }}</small>
            {% endif %}
          </div>
        {% endfor %}
        <p><button type="submit" class="btn btn-primary mt-2">Initialize Payment</button></p>
    </form>
</div>
{% endblock %}
Now, run the command below to start the Django development server.
python manage.py runserver
Visit http://127.0.0.1:8000/payment/ on your browser. You should see a page similar to the image below.

Adding Paystack to Your Project
Open https://dashboard.paystack.com/#/settings/developers in your browser. You can access this page from the Paystack dashboard by clicking Settings and selecting API Keys & Webhooks.
Scroll down; you’ll see the following interface.

Paystack provides a key pair for two environments, test and live environments.
There is a Public key and a Secret key for each environment. Test mode public keys have the prefix pk_test_, and live mode public keys have the prefix pk_live_. Test mode secret keys have the prefix sk_test_, and live mode secret keys have the prefix sk_live_.
You will need this information to authenticate requests to the Paystack API. You should always keep your private key secret and store it securely(I’ll regenerate mine before publishing this article).
Add the following settings(keys) to the settings.py file of your project.

Replace the PAYSTACK_TEST_SECRETE_KEY and PAYSTACK_TEST_PUBLIC_KEY values with the test Public key and the Secret key provided by Paystack.
You will use the PAYSTACK_INITIALIZE_PAYMENT_URL to call the Paystack Initialize Transaction API from your application to generate a checkout link and redirect users to the link so they can make payments.
Integrating Paystack Checkout
The integration process involves a checkout page hosted by Paystack, where users can input their payment details (typically credit card information) and complete the transaction.
When a payment is successfully processed, Paystack redirects the client to a success page(callback_url), while cancelled payments redirect to a cancelled page.
You will implement three views:
payment_process: The view generates a Paystack request session and redirects the client to a payment form hosted by Paystack. A checkout session is a structured representation of the payment form that the client interacts with.payment_success: Displays a message for successful payments. The user is redirected to this view if the payment is successful.payment_canceled: Displays a message for cancelled payments. The user is redirected to this view if the payment is cancelled
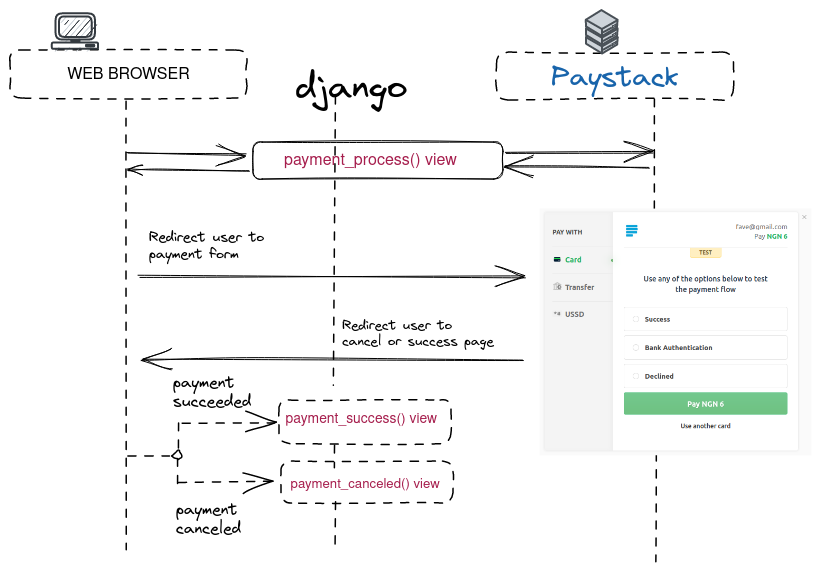
The complete checkout process will work as follows:
Once a payment is initiated, the user will be directed to the
payment_processview to see the payment summary and click a button to proceed.When the user proceeds with the payment, a Paystack request session will be created that contains information(
session_data) about the user, the amount, metadata, and the URL(callback_url) to redirect the user to after payment completion or cancellation.Next, the view redirects the user to the Paystack-hosted checkout page, which includes the payment form. The user enters their card details and submits the form.
Paystack will process the payment and redirect the user to the
payment_successview. However, the user will be redirected to thepayment_canceledview if the payment is incomplete.
Edit the views.py file in the payment application and add the following code.
import json
import requests
from django.conf import settings
from django.shortcuts import get_object_or_404
from payment.models import Payment

# create the Paystack instance
api_key = settings.PAYSTACK_TEST_SECRETE_KEY
url = settings.PAYSTACK_INITIALIZE_PAYMENT_URL

###previous code###

def payment_process(request):
    # retrive the payment_id we'd set in the djago session ealier
    payment_id = request.session.get('payment_id', None)
    # using the payment_id, get the database object
    payment = get_object_or_404(Payment, id=payment_id)
    # retrive payment amount
    amount = payment.get_amount()

    if request.method == 'POST':
        success_url = request.build_absolute_uri(
            reverse('payment:success'))
        cancel_url = request.build_absolute_uri(
            reverse('payment:canceled'))

        # metadata to pass additional data that
        # the endpoint doesn't accept naturally.
        metadata= json.dumps({"payment_id":payment_id,
                              "cancel_action":cancel_url,
                            })

        # Paystack checkout session data
        session_data = {
            'email': payment.email,
            'amount': int(amount),
            'callback_url': success_url,
            'metadata': metadata
            }

        headers = {"authorization": f"Bearer {api_key}"}
        # API request to paystack server
        r = requests.post(url, headers=headers, data=session_data)
        response = r.json()
        if response["status"] == True :
            # redirect to Paystack payment form
            try:
                redirect_url = response["data"]["authorization_url"]
                return redirect(redirect_url, code=303)
            except:
                pass
        else:
            return render(request, 'payment/process.html', locals())
    else:
        return render(request, 'payment/process.html', locals())
In the previous code, the JSON and requests modules are imported, and the Paystack API key is set using the value of the PAYSTACK_TEST_SECRETE_KEY setting. The URL to initialize payment on the Paystack server is also set using the value of the PAYSTACK_INITIALIZE_PAYMENT_URL setting.
The payment_process view performs the following tasks:
The current Payment object is retrieved from the database using the
payment_idsession key, stored previously in the session by thepayment_initview.The Payment object for the given ID is retrieved using the shortcut function,
get_object_or_404()and an Http404 (page not found) exception is raised if no order is found with the given ID.The
payment/process.htmltemplate is rendered and returned if the view is loaded with a GET request. This template will include the payment summary and a button to proceed with the payment, which will send a POST request to the view.If the view is loaded with a POST request, then a post request, including an authorization header, and the session data is sent to the Paystack API server to initialize the transaction.
To initialize a transaction, you’ll need to pass data such as email, first name, last name, amount, transaction reference, metadata, etc.
- The metadata allows us to send additional data that would be returned to you via a Webhook request sent by the Paystack server. You can add parameters that an endpoint doesn’t accept naturally with
metadata. As you can see, the metadata is encoded in JSON, as Paystack API requires.
- The metadata allows us to send additional data that would be returned to you via a Webhook request sent by the Paystack server. You can add parameters that an endpoint doesn’t accept naturally with
After sending a POST request, a response containing a checkout link is returned by the Paystack API.
Use a
tryandexceptblock to handle any form of error that might occur. Hence, an HTTP redirect using the checkout URL with status code 303 is returned to redirect the user to Paystack checkout.The status code 303 is recommended to redirect web applications to a new URI after performing an HTTP POST.
Now that the payment_process view is done. Let’s create simple views for payment success and cancel pages.
Edit the views.py file of the payment application and add the following code:
###previous code###

def payment_success(request):
    return render(request, 'payment/success.html')

def payment_canceled(request):
    return render(request, 'payment/canceled.html')
Next, Edit the urls.py payment application file and update it as below.
from django.urls import path
from . import views

app_name = 'payment'

urlpatterns = [
    path('', views.payment_init, name='create'),
    path('process/', views.payment_process, name='process'), #new
    path('success/', views.payment_success, name='success'), #new
    path('canceled/', views.payment_canceled, name='canceled'), #new
]
These are the URLs for the payment workflow. You have included the following URL patterns:
process: The view that displays the payment summary to the user creates the Paystack request session and redirects the user to the Paystack-hosted payment form.success: The view for Paystack redirects the user to see if the payment is successful.canceled: The view for Paystack to redirect the user to if the payment is cancelled
Create a template for each view. Inside the template directory, create the following file structure.

Edit the templates/payment/process.html template and add the following code to it.
{% extends "base.html" %}
{% load widget_tweaks %}

{% block content%}
<div class="container mt-3">
    <h1>Payment {{ payment.id }}</h1>
    <ul class="object-tools">
        <li>
            <a href="#" onclick="window.print();">
                Print payment
            </a>
        </li>
    </ul>
    <table class="table">
        <tr>
            <th>Created</th>
            <td>{{ payment.created }}</td>
        </tr>
        <tr>
            <th>Customer</th>
            <td>{{ payment.first_name }} {{ payment.last_name }}</td>
        </tr>
        <tr>
            <th>E-mail</th>
            <td><a href="mailto:{{ payment.email }}">{{ payment.email }}</a></td>
        </tr>
        <tr>
            <th>City</th>
            <td>
                {{ payment.city }}
            </td>
        </tr>
        <tr>
            <th>Total amount</th>
            <td>${{ payment.get_amount }}</td>
        </tr>
        <tr>
            <th>Status</th>
            <td>{% if payment.paid %}Paid{% else %}Pending payment{% endif %}</td>
        </tr>
        <tr>
            <th>Paystack payment</th>
            <td>
                {% if payment.paystack_ref %}
                    ##################
                {% endif %}
            </td>
        </tr>
    </table>
    <form action="{% url "payment:process" %}" method="post">
        <input type="submit" class="btn btn-primary mt-2" value="Pay now">
        {% csrf_token %}
    </form>
</div>
{% endblock %}
This template displays the payment summary and allows the user to proceed. It includes a form and a Pay Now button to submit. When the form is submitted, the payment_process view creates the Paystack request session and redirects the user to the Paystack-hosted payment form.
Edit the templates/payment/success.html template and add the following code to it.
{% extends "base.html" %}
{% load widget_tweaks %}

{% block content%}
<div class="container mt-3">
    <h1>Your payment was successful</h1>
    <p>Your payment has been processed successfully.</p>
</div>
{% endblock %}
Edit the templates/payment/canceled.html template and add the following code to it.
{% extends "base.html" %}
{% load widget_tweaks %}

{% block content%}
<div class="container mt-3">
    <h1>Your payment has not been processed</h1>
    <p>There was a problem processing your payment.</p>
</div>
{% endblock %}
You have implemented the necessary views to process payments, including their URL patterns and templates. It’s time to try out the checkout process.
Testing the Payment Process
Visit http://127.0.0.1:8000/payment/, fill out the payment initialization form, and submit. You will be directed to the payment process page, like the interface below. You can see the payment summary and a Pay Now button.
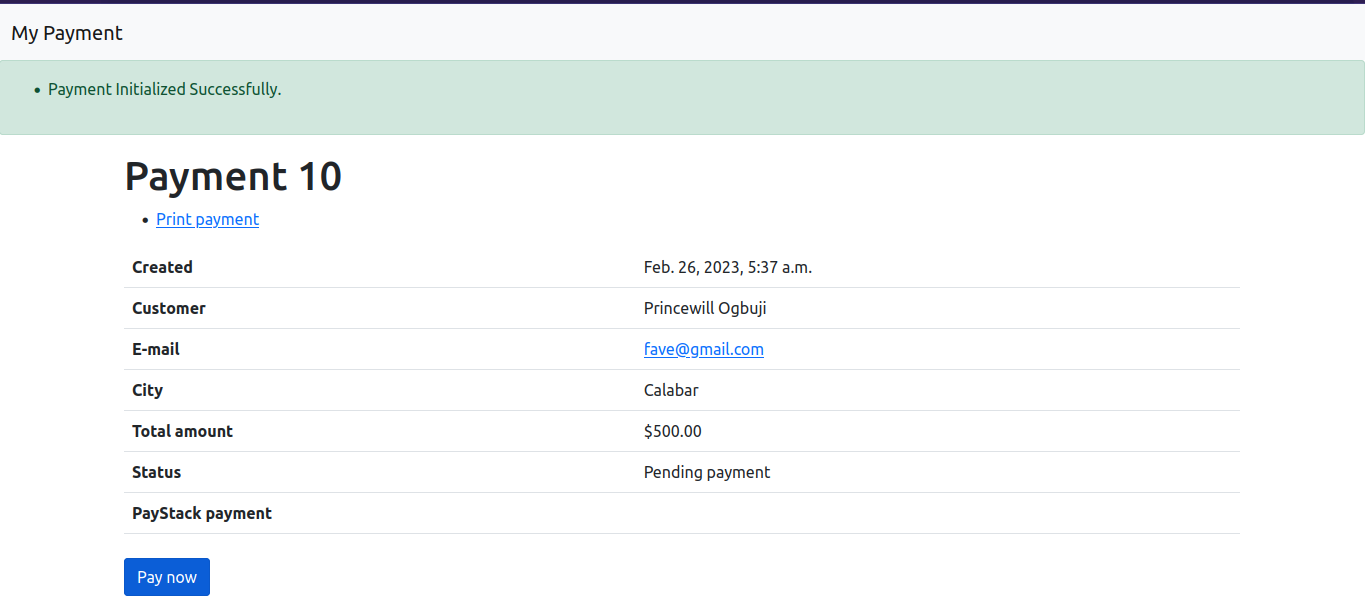
Confirm your details and proceed to click the pay now button. The
payment_ processview will create a Paystack request session and redirect you to the Paystack-hosted payment form. You will see the following page.
Since you’re using the API configuration for test mode, Paystack provides an efficient means for testing payments without using your actual card or bank info.
Paystack also provides test credit cards from different card issuers and locations, which allows you to simulate payments to test all possible scenarios (successful payment, declined payment, etc.). You can use these cards or bank details by selecting the Use another card option at the bottom of the form.
The following table shows some of the cards you can test for different situations:
| Outcome | Test credit cards | CVC | Expiry date |
| Success | 4084084084084081 | 408 | Any future dates |
| Failed | 4084080000005408 | 001 | Any future dates |
| API Error | 4084084084084081 | 408 | Any future dates |
Proceed with using the initial form provided by Paystack.
Select the success option and click on the Pay button. After a few seconds, you will see a success page like the one below.

Then Paystack redirects you to the payment success URL(callback_url) you provided in the session data when creating the request session. You’ll see the following page.

If you cancel the payment, then you’ll see the following page.

Congratulations! You have successfully integrated Paystack Checkout into your project.
Verify Payments and Store Paystack Reference
Each Paystack payment has a unique identifier. You can use the payment ID to associate each payment with its corresponding Paystack payment.
Recall when creating your payment model earlier, you included a field with the name payment_ref. This field will allow you to link each payment with the related Paystack transaction.

Notice that when a payment is successful, the user is redirected to the payment success page rendered by the payment_success view; the URL contains a query parameter with the names trxref & reference, as seen below.

You can also use the trxref & reference query parameters to verify payments. You do this by sending a GET request to your server’s Verify Transaction API endpoint using the transaction reference. This is dependent on the method you used to initialize the transaction. You will see how to implement that as well.
You will update the payment_success view to retrieve the query parameter from the request object and then use it to update the payment_ref field of the Payment model.
Edit the payment_success function in the views.py file of the payment application and add the following lines of codes with ‘#new’ at their end.
def payment_success(request):

    # retrive the payment_id we'd set in the django session ealier
    payment_id = request.session.get('payment_id', None)#new
    # using the payment_id, get the database object
    payment = get_object_or_404(Payment, id=payment_id)#new

    # retrive the query parameter from the request object
    ref = request.GET.get('reference', '')#new
    # verify transaction endpoint
    url = 'https://api.paystack.co/transaction/verify/{}'.format(ref)#new

    # set auth headers
    headers = {"authorization": f"Bearer {api_key}"}#new
    r = requests.get(url, headers=headers)#new
    res = r.json()#new
    res = res["data"]

    # verify status before setting payment_ref
    if res['status'] == "success":  # new
        # update payment payment reference
        payment.paystack_ref = ref #new
        payment.save()#new

    return render(request, 'payment/success.html')
In the code above, you have modified the payment_success function in the views.py file of the payment application to be able to store payment references.
The payment_success view performs the following tasks:
The current Payment object is retrieved from the database using the payment_id session key, stored previously in the session by the payment_init view.
The Payment object for the given ID is retrieved. Using the shortcut function,
get_object_or_404(). An Http404 (page not found) exception is raised if no order is found with the given ID.The query parameter is retrieved from the request object.
A request is initialized with an authorization header containing your Paystack secret key. This would allow Paystack to verify that the request originates from a trusted source.
With the help of the Python requests library, a get request is sent to the verify transaction API and the JSON response is retrieved.
The payment status is checked in an
ifclause, and thepayment_refof the Payment object is updated if the status equalssuccess.
Now, initiate a payment and complete the transaction.
Visit your Django project administration site: http://127.0.0.1:8000/admin/payment/payment/ and select the just completed payment.
You should see the paystack_ref field populated with the reference for that particular payment.

Learn more about the Paystack API format.
You’ve successfully integrated Paystack checkout and functionality to verify and store payment references.
Source Code: https://github.com/princewilling/django-X-paystack
Using Webhook to Receive Payment Notifications – Part 2
You will implement a Webhook functionality that allows event-driven communication between our Django application and Paystack server. This functionality will enable you to receive notifications about successful payments from Paystack, which you will use to mark the paid status of payment to True


