Integrating Paystack Payment Gateway Into Your Django Project - Part II
Setup Webhooks to Receive Payment Notifications From Paystack


You'll set up a webhook functionality that allows event-driven communication between your Django application you started in part one (1) and the Paystack server.
Webhooks are a mechanism used in web development to enable real-time communication between different web applications or services. They allow one application to send data to another application as soon as a specific event or trigger occurs.
This functionality will enable you to receive notifications about successful payments from Paystack, which you'll use to mark the paid status of payments to True.
Objective
- Use Webhooks to manage payment notifications and verification - Part 2
Prerequisite
- Prior experience using ngrok
Note, This is part two (2) of the article and continuous from where part one (1) of the article stopped. The reason for the split is to enable readers to digest the information and to allow for a more focused and in-depth exploration of the topic. I highly recommend you read part one(1) to avoid getting confused.
Using Webhooks to Receive Payment Notifications
Paystack can send real-time events to our application via webhooks, which are also referred to as callbacks. Instead of making frequent requests to the Paystack server to check for new payment completions.
Webhooks operate as an event-driven API, allowing Paystack to send an HTTP request to a specific URL of your application to notify you of successful payments instantly. The notifications of these events will be asynchronous, meaning that they will happen nonetheless of our synchronous calls to the Paystack API.
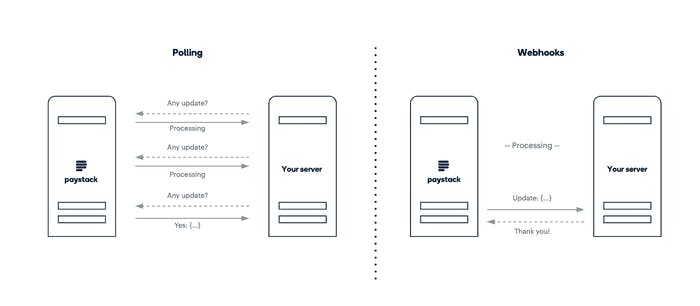
To process these events, you will create a webhook endpoint that includes a view that receives a JSON payload containing the event details. You can mark payments as paid with the event details if the payment process was successful.
Setting Up ngrok
To successfully implement the webhook functionality you need your application to be publicly accessible via a URL as Paystack can't send requests to your local host at localhost:8000. So, you're going to make use of ngrok to serve your application.
ngrok is the fastest way to host your service on the internet. Ngrok is a simplified API-first ingress-as-a-service that adds connectivity, security, and observability to your apps with no code changes.
With the help of Ngrok, you could make the Django application running on our local machine available to the public by publishing the port (8000) on which your Django application is running to the Ngrok server, which returns a secured URL that can be accessed publicly over the internet.
Visit https://ngrok.com/download to download and set up ngrok on your machine. It's simple and straightforward.
Next, update the mypayment/settings.py file of the project to include the following line of code.
  ...
  ALLOWED_HOSTS = ["*"]
  CSRF_TRUSTED_ORIGINS = ['https://*.ngrok.io']
  ...
The
ALLOWED_HOSTvariable holds a list of strings representing the host/domain names that your Django application can serve. This is a security measure to prevent HTTP Host header attacks, which are possible even under many seemingly safe web server configurations. While theCSRF_TRUSTED_ORIGINSvariable holds a list of trusted origins for unsafe requests (e.g. POST).Therefore, Adding the code above allows your application to be accessible from other hosts/domains. Read more at https://docs.djangoproject.com/en/4.1/topics/settings/ & https://docs.djangoproject.com/en/4.1/ref/csrf/
Run the commands below to publish the Django application port.
python manage.py runserverOpen a new terminal window and run.
ngrok http 8000
Your output should look like the one below. The Forwarding row is your publicly accessible URL.
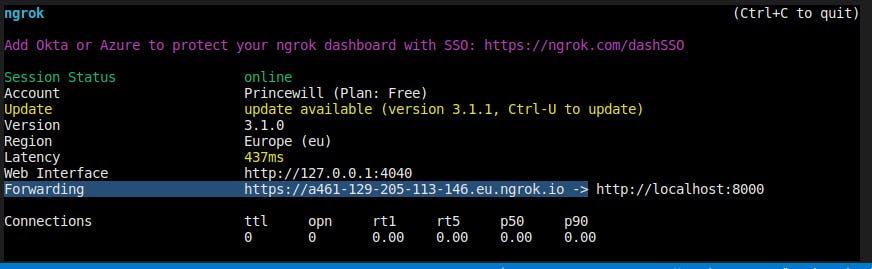
Visit <Fowarding>/payment on your browser to access the application.
You've successfully made your application accessible to the public. Also, you have a publicly secured URL that Paystack sends requests (events) to.
Adding the Webhook View and URL
Open https://dashboard.paystack.com/#/settings/developers in your browser. You can access this page from the Paystack dashboard by clicking on Settings and selecting API Keys & Webhooks. Scroll down, You'll see the following interface.
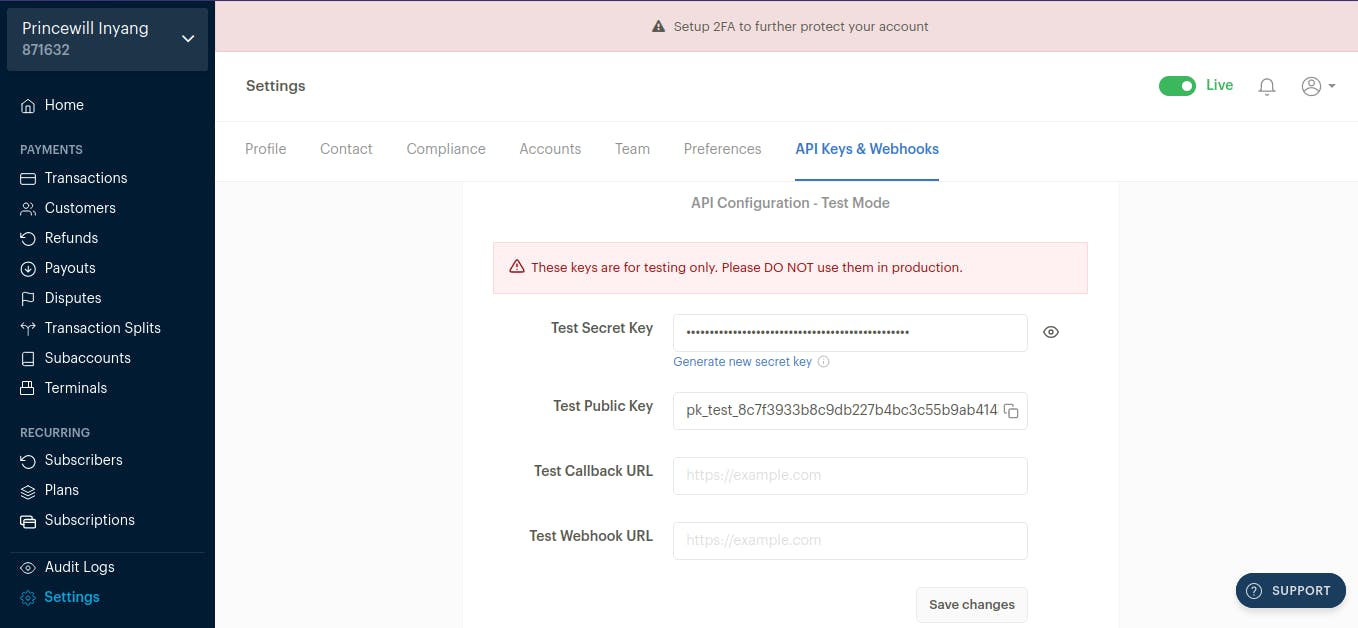
Populate the Test Webhook URL field with <Fowarding>/payment/webhook/. Replace the Forwarding with the one ngrok generated for you. In my case, https://0a78-197-211-59-126.eu.ngrok.io/payment/webhook/
Implement the Webhook View
You need to implement a view to handle the events (requests) Paystack sends through the webhook URL.
Add a new file to the payment/application directory and name it webhooks.py. Add the following code to the webhooks.py file.
import hmac
import hashlib
import json
from django.conf import settings
from django.http import HttpResponse
from django.views.decorators.csrf import csrf_exempt
from .models import Payment

secret = settings.PAYSTACK_TEST_SECRETE_KEY

@csrf_exempt
def stack_webhook(request):
    # retrive the payload from the request body
    payload = request.body
    # signature header to to verify the request is from paystack
    sig_header = request.headers['x-paystack-signature']
    body = None
    event = None

    try:
        # sign the payload with `HMAC SHA512`
        hash = hmac.new(secret.encode('utf-8'), payload, digestmod=hashlib.sha512).hexdigest()
        # compare our signature with paystacks signature
        if hash == sig_header:
            # if signature matches,
            # proceed to retrive event status from payload
            body_unicode = payload.decode('utf-8')
            body = json.loads(body_unicode)
            # event status
            event = body['event']
        else:
            raise Exception
    except ValueError as e:
        # Invalid payload
        return HttpResponse(status=400)
    except KeyError as e:
        # Invalid payload
        return HttpResponse(status=400)
    except:
        # Invalid signature
        return HttpResponse(status=400)

    if event == 'charge.success':
        # if event status equals 'charge.success'
        # get the data and the `payment_id`
        # we'd set in the metadata ealier
        data, payment_id = body["data"], body['data']['metadata']['payment_id']

        # validate status and gateway_response
        if (data["status"] == 'success') and (data["gateway_response"] == "Successful"):
            try:
                payment = Payment.objects.get(id=payment_id)
            except Payment.DoesNotExist:
                return HttpResponse(status=404)
            # mark payment as paid
            payment.paid = True
            payment.save(force_update=True)

            print("PAID")

    return HttpResponse(status=200)
The @csrf_exempt decorator is used to prevent Django from performing the CSRF validation that is done by default for all POST requests.
Use the Python hmac library to sign the request payload-body and compare it with the Paystack signature header (
x-paystack-signature) to confirm the validity of the request.If the signature is invalid, return an HTTP 400 Bad Request response. Otherwise, return an HTTP 200 OK response.
Check if the event status equals charge.success. This status indicates that the checkout session has been completed.
Upon event success, retrieve the data from the payload body and the payment_id set in the session data using the metadata when creating the payment requests session in part one (1).
Check for the transaction status and gateway response; if successful, use the Django ORM to retrieve the Payment object with the given ID. If the payment does not exist, raise an HTTP 404 exception. Otherwise, mark the payment as paid with
payment.paid = Trueand save it.
Add the Webhook URL to Your Application
Edit the urls.py file of the payment application and add the following code with "# new" at the end of the line.
from django.urls import path

from payment import webhooks as wh # new
from . import views

app_name = 'payment'

urlpatterns = [
    path('', views.payment_init, name='create'),
    path('process/', views.payment_process, name='process'),
    path('success/', views.payment_success, name='success'),
    path('canceled/', views.payment_canceled, name='canceled'),
    path('webhook/', wh.stack_webhook, name='stack-webhook'),# new
]
Imported the webhooks.py module and added the URL pattern for the webhook.
Testing webhook notifications
Create an admin user for your Django project if you haven't created one already. Run the following command on the terminal.
$ python manage.py createsuperuserVisit
<Fowarding>/payment/webhook/.Fill out the payment initialization form and submit it.
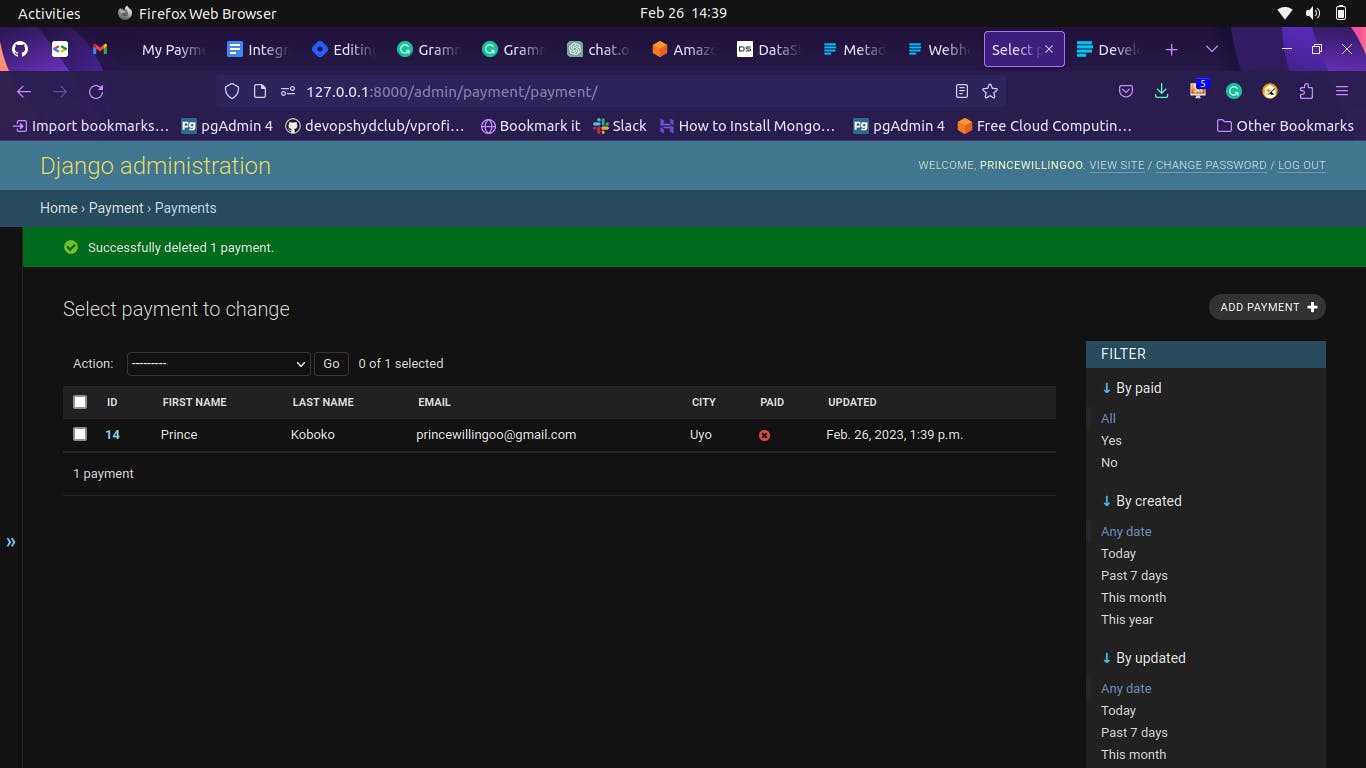
Open a new tab and visit http://127.0.0.1:8000/admin/payment/payment/. You'll see the payment you just initialized. Notice how the paid status is marked False with a red icon. You can click on the ID to open a detailed view.
Head back to the previous tab and continue with the payment process. Click on Pay Now and finish the payment. After which, you'll be redirected to the payment successful page.
Re-visit the Django project administration site (the previous tab) and refresh the page. Notice the paid status has been updated to True with a green icon.
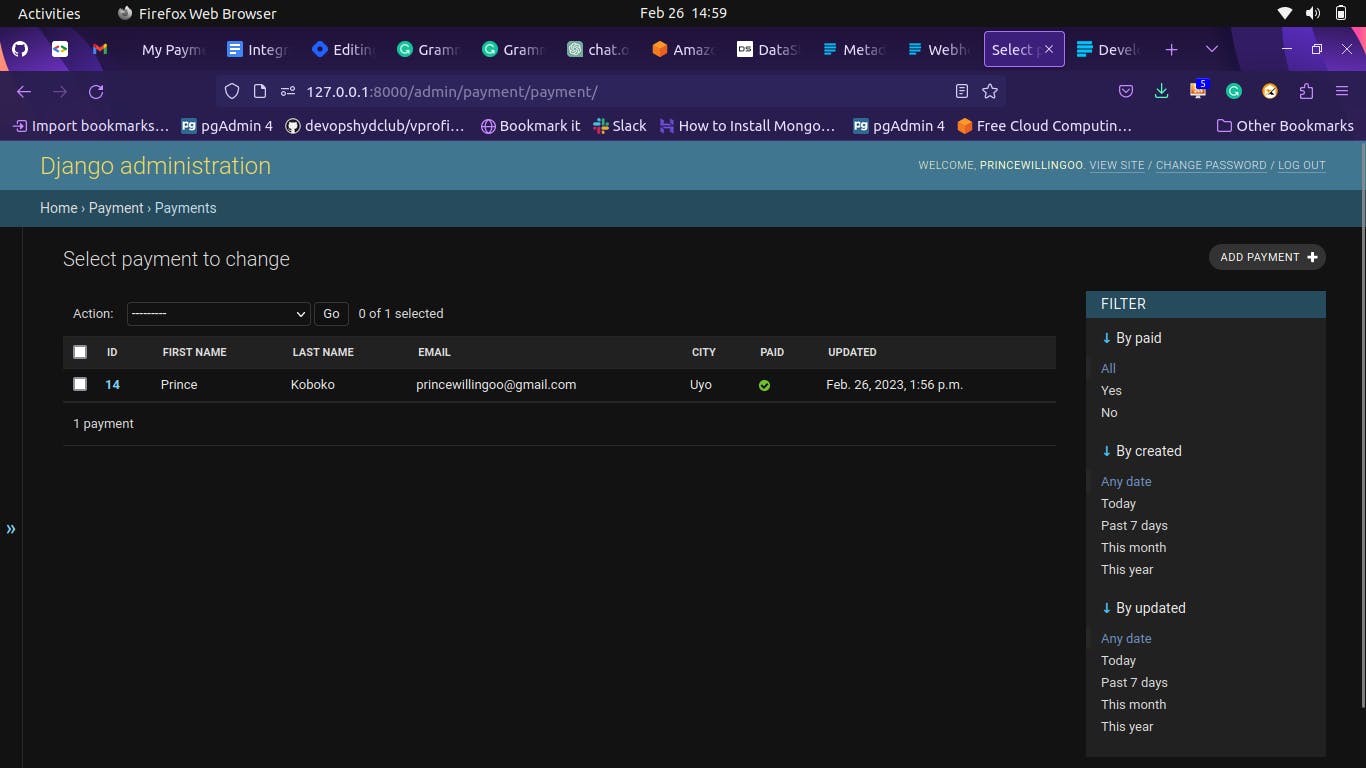
This is because after the payment and checkout process was completed successfully, Paystack sent an event (requests) containing the payment and checkout data to the webhook URL you provided.
Now, payments get automatically marked as paid through Paystack payment notifications.
Source code: https://github.com/princewilling/django-X-paystack