

Automation is a cornerstone of efficient software development, enabling developers to streamline repetitive tasks and focus on more creative and critical aspects of their work. Whether it's regular data backups, periodic database maintenance, or routine cleanup operations, automating these tasks not only saves time but also reduces the risk of human error.
Here, you'll see how to leverage the time-tested scheduling tool called Cron within the Docker ecosystem. You'll go through the process of setting up Cron inside a Docker container, scheduling tasks at specific intervals, and managing task execution.
Prerequisites
Ensure you have a basic understanding of Docker
Make sure you have docker installed on your machine.
Familiarity working with bash terminal, command prompt, or power shell.
Why Docker for Scheduling Tasks?
Docker has gained immense popularity in the world of software development and deployment, and for good reason. It offers a range of benefits that make it a suitable choice for scheduling and automating tasks:
Isolation: Docker containers provide a consistent and isolated environment for your tasks, ensuring that they run in the same environment across different systems. This consistency helps avoid compatibility issues that can arise when running tasks on various machines.
Portability: Docker containers are lightweight and portable, making it easy to package tasks and their dependencies into a single, encapsulated unit. This portability allows you to move tasks seamlessly between development, testing, and production environments.
Efficiency: Docker containers share the host system's kernel, which results in minimal overhead compared to traditional virtual machines. This efficiency means you can run multiple containers on the same host without significant resource overhead.
Version Control: Docker images can be version-controlled, ensuring that you can always reproduce the exact environment in which your tasks run. This version control is invaluable when debugging or rolling back to previous task configurations.
Understanding the Cron Syntax for Scheduling Tasks
Cron scheduling is highly flexible and follows a specific syntax that allows you to define when and how often a task should run.
The Cron syntax consists of five fields, each representing a time unit:
Minute (0 - 59): Specifies the minute of the hour when the task should run.
Hour (0 - 23): Specifies the hour of the day when the task should run.
Day of the Month (1 - 31): Specifies the day of the month when the task should run.
Month (1 - 12 or JAN - DEC): Specifies the month when the task should run.
Day of the Week (0 - 7 or SUN-SAT, where both 0 and 7 represent Sunday): Specifies the day of the week when the task should run.
The Cron syntax allows you to use wildcards, ranges, and lists to create a wide range of schedules. For example:
Runs the task every minute, all day, every day.
crontab * * * * * task.shRuns the task at the start of every hour.
crontab 0 * * * * task.shRuns the task daily at midnight.
crontab 0 0 * * * task.shRuns the task at 2:00 AM from Monday to Friday.
crontab 0 2 * * 1-5 task.sh
Configuring a Cron Job Inside a Docker Container
To configure a cron job inside a Docker container, you'll need a task and Dockerfile to build a custom image for your task.
Create a Task
For the task, you'll create a shell script that regularly takes a backup of a directory. The script will be executed based on the cron schedule.
Add the code below to a file, script.sh:
#!/bin/bash

# Set the source and destination directories
SOURCE_DIR="/home"
DEST_DIR="/backup"

# Create a timestamp to use in the backup filename
TIMESTAMP=$(date +"%Y%m%d%H%M%S")

# Define the backup filename
BACKUP_FILENAME="backup_$TIMESTAMP.tar.gz"

# Create a compressed backup of the SOURCE_DIR directory
tar  -czf  "$DEST_DIR/$BACKUP_FILENAME"  -C  "$SOURCE_DIR"  .

# Logging (optional): Redirect output to a log file
echo  "Backup completed: $BACKUP_FILENAME"  >>  /var/log/directory_backup.log

# End of script
Now, when the script is executed, it will take a backup of the SOURCE_DIR and save the compressed file to DEST_DIR within the container, which you can map to a docker volume or bind mount.
Create a Dockfile
Create a Dockerfile in the same directory as the script.
Step 1: Define the Base Image
Specify the base Docker image to use as the foundation for your container. You can choose an image that matches your requirements, such as Ubuntu or Alpine Linux.
FROM ubuntu:latest
The FROM instruction sets the base image for your Docker container.
Step 2: Install Dependencies
Next, you'll install the necessary dependencies within the container. In this case, you need cron.
# Install required packages
RUN  apt-get  update  &&  apt-get  install  -y  cron
The RUN instruction is used to run commands within the container during the image build process.
Step 3: Create a Directory for the Backup
Create a directory within the container where you'll store the backup. You can map this directory to a docker volume or bind mount on your local machine.
# Create a directory for the script and data
RUN mkdir -p /backup
This command ensures that the directory /backup exists in the container.
Step 4: Copy the Backup Script
Copy your script (named script.sh) into the container's directory.
# Copy your script into the container
COPY script.sh /script.sh
The COPY instruction copies files from your local machine into the container.
Step 5: Make the Script Executable
This step ensures that the script can be executed within the container.
# Make the script executable
RUN chmod +x /script.sh
Step 6: Set Up the Cron Job
Define the cron job schedule that will run your script. This example schedules it to run every minute.
# Set up the cron job
RUN echo "* * * * * /script.sh" | crontab -
The echo command sets the cron job schedule, and the crontab - command applies it.
Step 7: Start the Cron Service
Specify the default command that should be executed when you start the container.
# Start the cron service in the background
CMD ["cron", "-f"]
In this case, you start the cron service in the foreground.
Step 8: Build the Docker Image
Build the Docker image using the docker build command. Navigate to the directory containing your Dockerfile and run:
docker build -t backup-container .
Replace backup-container with your desired image name.

Step 9: Run the Docker Container
Finally, run a Docker container based on the image you've created and map the backup directory in the container to a backup directory on your local machine using bind mount.
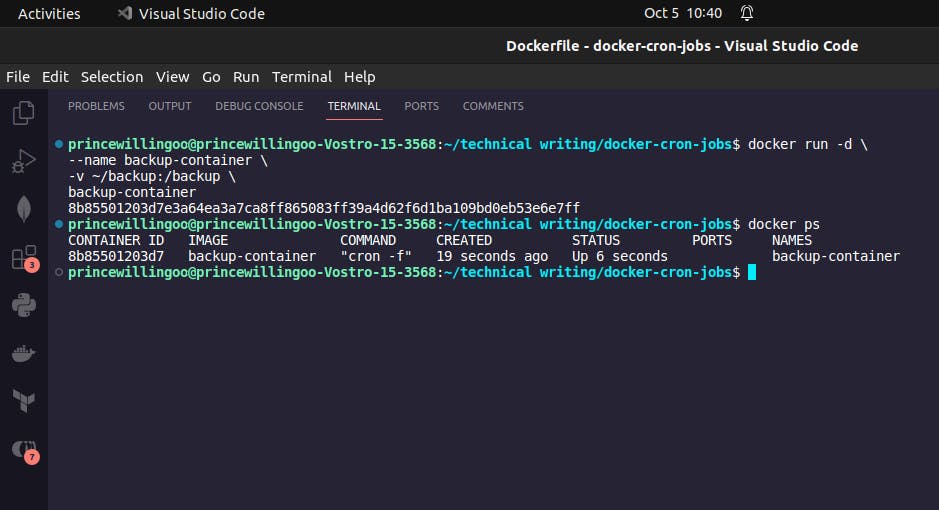
docker run -d \
--name backup-container \
-v ~/backup:/backup \
backup-container
This command starts the container in detached mode and gives it a name (backup-container). You can run the docker ps command to see active containers.
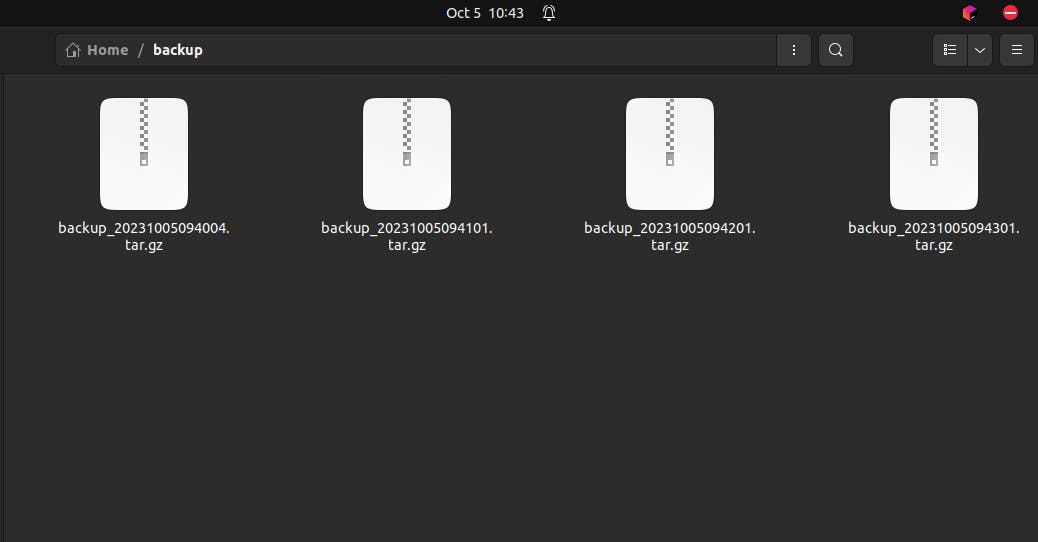
The bind mount will map the ~/backup directory on your host machine to the backup directory inside the backup-container Docker container. Any changes made in the container's backup directory will be reflected on the host machine and vice versa.
Bind mounts have limited functionality compared to volumes.
You've now successfully created a Docker container that runs your script on a schedule using cron. The container is isolated and self-contained, making it easy to deploy and manage your task process.
Managing the Cron Job
With your container up and running, you can access it and make changes if need be.
Remember, Docker containers are volatile, which means any changes made within a container will be lost once the container is discarded.
Access the Container
Use the docker exec command to access the running Docker container:
docker exec -it backup-container /bin/bash
The command takes you to the container shell environment, where you can execute commands.

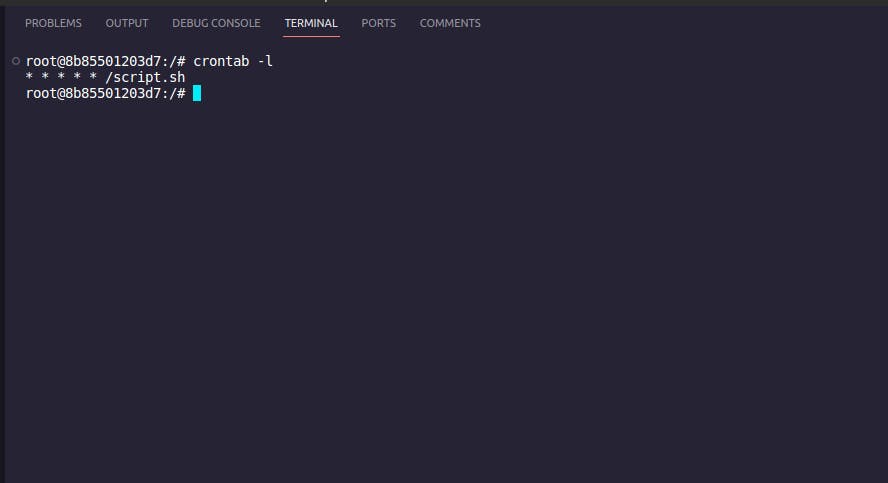
List All Active Cron Jobs
Inside the container's shell, you can list all active running cron jobs.
crontab -l
Just one active job.
Edit the Crontab
Inside the container's shell, you can edit the crontab file using the crontab -e command:
crontab -e
This will open the crontab file in the default text editor. You can add or edit Cron job entries here using the cron syntax shown earlier.

Run the command below to install the nano text editor if it doesn't exist.
apt-get install nano
With these, you can create and manage Cron jobs inside your Docker container to automate various tasks as per your desired schedule.
Conclusion
As you've seen in this article, Docker containers and Cron scheduling can significantly improve your software development workflow. Whether you're managing data backups, performing routine maintenance, or executing any recurring task, Docker's isolation and portability, combined with Cron's precision, make for a robust solution.
I encourage you to explore and implement Docker-based task scheduling in your projects. By doing so, you'll streamline your processes, reduce manual intervention, and enhance the reliability of your automated tasks. Embrace the power of Docker and Cron to make your development and operations more efficient and effective. Happy automating!!!